
Nut free granola is testament to the fact that you don’t necessarily need nuts to make something crispy, satisfying and deeply comforting. Whether you’re cooking for someone who has allergies or packing school lunches your priority is our granola brings all the classic taste with none of the worry in a nut-free variety These tasty sweet flavor and crunch are yours, without the nuts. It’s golden yellow, gently sweet and full of texture: a solid go-to for mornings and snacking.
Homemade granola has a certain appeal. It warms up your kitchen, smells of slow mornings and tells you that basic ingredients can still be something special. Using the granola recipe balance of texture, taste and subtle sweetness, this nut free version does not feel like a cop out.
Table of Contents
Why Is Nut Free Granola So Popular
Allergy-friendly granola is on the rise not only because of allergen concerns, but also for its convenience and versatility. A good percentage of families will be in search of recipes that they are OK to share with their kids at school, or camp, and other nut-free places.
Beyond safety, nut free granola gives other ingredients — seeds, grains and dried fruit — the starring role they deserve. It lightens, becomes more digestible and — far less costly, if often still somewhat crunchy and flavorful spoonful for the results achieved.
Understanding Nut Free Granola
At its core, granola is all about toasted grains, natural sweetness and texture. Classic recipes are packed with nuts for crunch, but nut free granola provides the same satisfaction using seeds, oats, and smart baking techniques.
This recipe capitalizes on slow toasting and a bit of gentle stirring to ensure oats brown evenly and seeds develop deep, roasted flavors. The result is granola that seems intentional, nurturing and thoughtful rather than limiting.
Essential Ingredients
How to make this nut free granola For this homemade nut free granola recipe, you’ll need:
- Rolled oats
- Sunflower seeds
- Pumpkin seeds
- Sesame seeds
- Shredded coconut (optional but recommended)
- Honey or maple syrup
- Neutral oil (like coconut or sunflower oil)
- Vanilla extract
- Cinnamon
- Salt
- Dried fruit (raisins, craisins, or chopped dates)
Essential Tools
For this recipe you will need:
- Large mixing bowl
- Measuring cups and spoons
- Baking sheet
- Parchment paper
- Wooden spoon or spatula
- Oven
- Cooling rack
Preparing the Dry Ingredients
Begin by placing the rolled oats in a large mixing bowl. Stir in sunflower seeds, pumpkin seeds, sesame seeds and coconut if using. Toss gently to mix everything together well.
This step is key because uniform dry ingredients means even toasting. The oats are there for the structure of the granola; the seeds, to contribute crunch and depth without needing any nuts.
Mixing the Sweetener
In another bowl or measuring cup, mix honey or maple syrup and oil, vanilla extract, cinnamon and salt. Whisk until no lumps and completely mixed.
This blend coats the oats thoroughly, allowing them to toast rather than burn. It should be sweet without being cloying, and the natural flavors of the grains and seeds should shine through.
Combining and Coating
Add sweetened mixture to dry ingredients. With a wooden spoon or spatula, carefully stir until every oat and seed is coated. Don’t rush: Properly coating these, which means not over-crowding the pan, results in a better texture and even browning.
It should be lightly sticky to the touch, but not wet. If it looks dry, you can give it a little drizzle of oil; if too wet, more oats will counteract it.
Baking the Granola
Preheat your oven, and line a baking sheet with parchment paper. In an even layer, spread out the granola mixture, do not clump it unless you prefer a chunkier granola.
Bake, stirring every 10–15 minutes. This slow cooking process is what allows the oats to toast evenly without burning. As it bakes, your kitchen will be filled with the warm, comforting smell of something good is coming.
Achieving the Perfect Crunch
Granola hardens as it cools, so don’t overbake. Pull it out of the oven when golden but not too dark, fragrant and bubbling. Allow it to cool to room temperature on the baking sheet without disturbing.
This cooling period is essential. Too soon, and you could break up clusters and make the texture too soft. When it’s cool, you will find that your granola is crispy and satisfyingly crunchy.
Also Read: Pollo a la Crema Recipe
Adding Dried Fruit
Once the granola has cooled, stir in dried fruit. The fruit, added after baking, keeps the biscotti chewy and prevents scorching.
This adds little bursts of sweetness and contrast, to counterbalance the toasted flavors with softness. Depending on how sweet you prefer your granola, do not hesitate to increase or decrease the amount.
Serving Suggestions
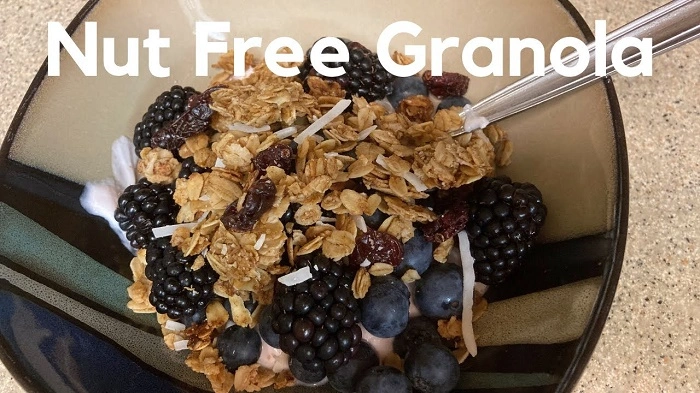
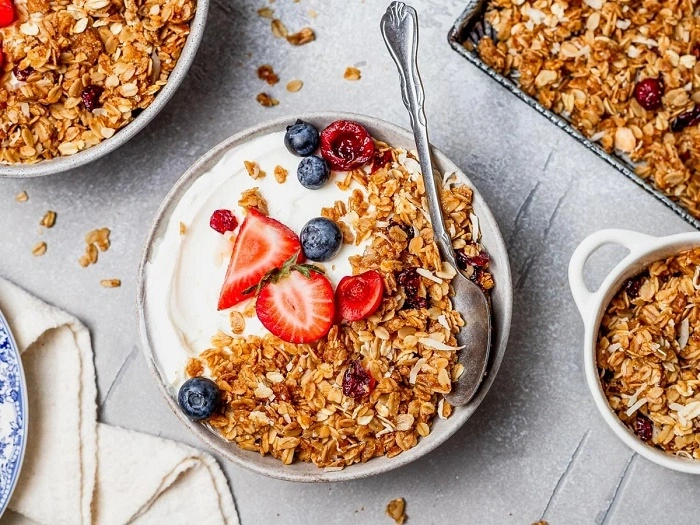
This nut free granola is so versatile. Just pair it with milk, yo or some kind of delicious plant-based substitute for breakfast. And sprinkle it on top of smoothie bowls or by the fistful, for that matter, as a snack.
It also makes a great topping for baked fruit, parfaits or even just adding a crunchy layer to desserts. Its gentle sweetness allows it to be used either sweetly or gently savoury.
Storage and Shelf Life
Cool completely and place your granola in an airtight container at room temperature. And it lasts for weeks and stays fresh and crisp if stored properly.
Do not refrigerate, as humidity will cause the texture to soften. If granola isn’t super crunchy, a quick zap in the oven can help crisp it back up.
Customization Ideas
This nut free granola is easy to customize! You might want to play around with spices, such as nutmeg or cardamom, or even cocoa powder for a chocolate version.
Seeds can be exchanged depending on preference and sweetness according to desired taste. This versatility means the recipe will work for various households and dietary preferences.
Common Mistakes to Avoid
If you overcrowd the baking sheet, they will bake unevenly. Never pile up granola on top of itself.
Another mistake that is often made is too much or not enough stirring. The Secret: Gently stirring occasionally ensures that clusters brown evenly without disturbing their formation too early.
Frequently Asked Questions
Is this granola safe for nut allergies?
As long as it’s made with everything certified nut free and isolated in a clean kept kitchen.
Can I make it vegan?
Yes — you can use honey.
Can I reduce the sugar?
Yes, the formula is adjustable, and if you would prefer to sweeten gently here too, go for it.
Is it suitable for kids?
Yes, it’s school-safe and kid-friendly.
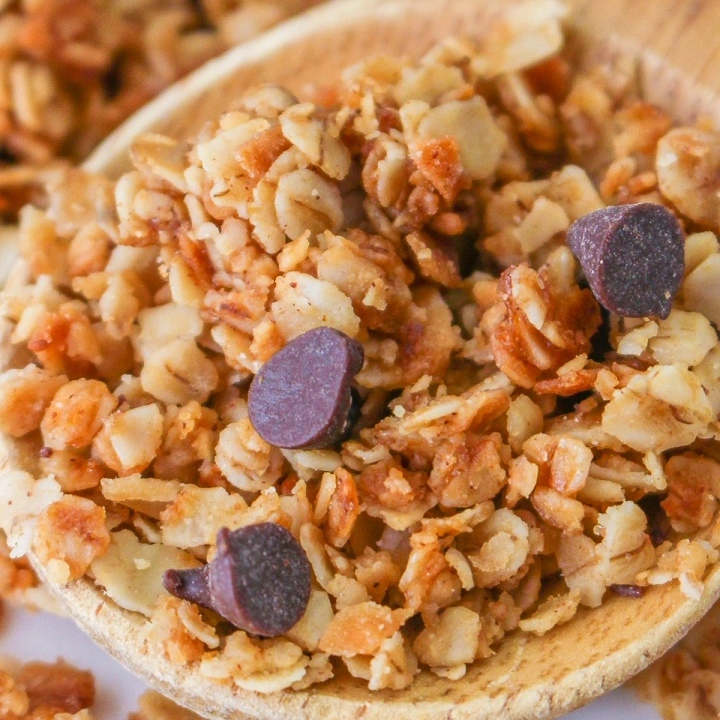
Can I add chocolate chips?
Yes, sprinkle them on after the granola has completely cooled.
Nut free granola is more than a substitute — it’s about being inclusive, thoughtful and getting everyone together. It’s a reminder that food can be safe and comforting and delicious all at once.
Through the virtues of a few-ingredient perfect simplicity and precise attention to detail, this recipe achieves crunch, warmth, comfort and dependability. Whether you’re serving it up in family’s morning bowls, packing it into school-safe snack bags (yay for allergy-friendly granola options that kids love!), or simply munching a few handfuls straight from the jar, nut free granola is the kitchen staple that never feels like you have to “settle” for something less.