
Baking banana bread with self-rising flour? That small swap alters everything behind the scenes. Moisture gets held differently because the built-in leavening kicks in faster. The way it puffs up in the oven shifts too, less gradual, more sudden. Even the softness lingers longer than you might expect.
Starts often come with a question: did you lose track of the baking powder again? Or maybe the all-purpose flour never made it into your bag at the store. Not every cook follows that path though. In certain places, humidity plays tricks on dry goods, so some turn to self-rising flour instead – it behaves better over time. What’s inside? Baking powder and salt, added right at the mill. Think roughly one and a half teaspoons of rising agent, plus a quarter teaspoon of salt, blended per cup. Mix it wrong and lumps form, but when kept sealed, the balance holds steady through scoops.
Table of Contents
Ingredient Overview
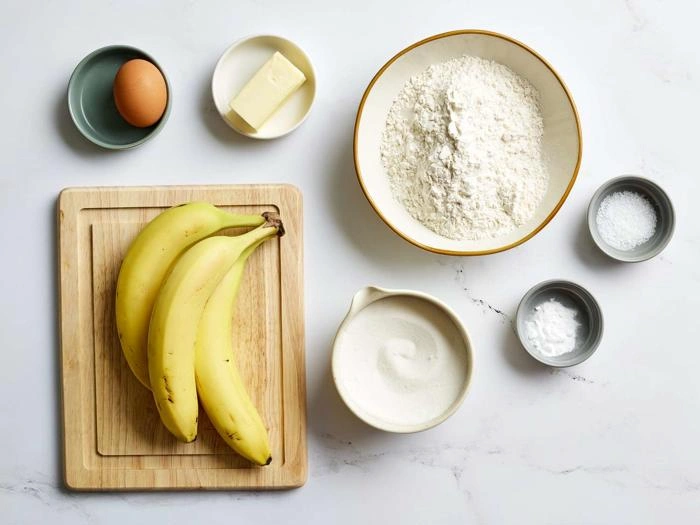
Main Ingredients
| Ingredient | Amount |
| Ripe bananas | 3 |
| Egg | 1 |
| Sunflower oil or melted coconut oil | 60 ml |
| Brown sugar | 90 g |
| Self-rising flour | 240 g (about 2 cups) |
Optional Additions
| Ingredient | Purpose |
| Walnuts | Added texture |
| Raisins | Extra sweetness |
| Cinnamon | Warm flavor |
Preparing the Banana Mixture
Peel back three soft bananas, almost bruised. Dark spots mean more sweetness inside, plus deeper flavor when cooked. Smush them slow in a big-enough bowl so there’s room next. Toss in an egg after. Stir just till it mixes – go gentle, less air means denser result later.
Mix in 60 milliliters of sunflower oil or coconut oil once it has melted. Unlike butter, liquid oils wrap around gluten proteins in a distinct way, limiting how quickly they absorb moisture and form firm networks. Because of this delay, the texture stays tender even when cooled down later.
After that comes sugar – use exactly 90 grams. The choice matters: brown sugar performs better here because its molasses pulls in water and keeps the product from drying out too fast.
Adding the Self-Rising Flour
Besides the liquids, add flour – roughly 240 grams, or close to two cups, if using self-rising wheat type. Since store-bought versions differ a bit by region, cup measures can shift results without warning. For steady outcomes, weighing beats guessing every time.
Slide the powder in slowly, mixing just until no dry trails remain. Once it looks blended, leave it be. Too much stirring wakes up the gluten, which tightens as it bakes, ending up heavy instead of light – an error often blamed on heat that’s too low.
A Note on Mix-Ins
Chopped walnuts, raisins, or just a touch of cinnamon come at the end. Because they change how heat moves through the mix, where you place them makes a difference.
Even when working with self-rising flour, give nuts a light coat before mixing – this keeps them spread out instead of dropping to the bottom.
Preparing the Loaf Pan
Turn the oven on to 175°C or 350°F. Try using a small heat checker inside – many kitchen ovens run too hot or cold, even off by 25 degrees, which changes how high things climb and how brown they get.
Slide some butter around a loaf dish measuring 21 by 11 centimeters, or tuck a sheet of baking paper into it so flaps stick out at the sides.
Pan Information
| Item | Measurement |
| Loaf pan length | 21 cm |
| Loaf pan width | 11 cm |
| Oven temperature | 175°C / 350°F |
Tip the mix into the container. Smooth the surface without pressing down hard. Maybe lay a narrow ribbon of extra mixture right down the middle first – the shape holds better, plus splits are less likely to open wide during cooking.
Baking the Banana Bread
Start baking – fifty to sixty minutes should do it.
Doneness Guide
| Test | Result |
| Skewer comes out wet | Keep baking |
| Skewer comes out with a few crumbs | Ready |
| Skewer comes out clean | Done |
Slide a thin stick into the center spot. If it comes out tidy, maybe with bits that aren’t sticky, stop right there.
Take the bread out straight away. Wait ten full minutes before shifting; grab the paper edges or tip gently onto a stand. Lingering past that stretch keeps heat locked under, turning the bottom oddly tender.
What Happens After Baking
Success shows up not in shade or rise but next morning. How it feels inside matters more than looks.
After cooling, changes keep happening quietly. Water moves through the loaf at its own pace. Days later, structure tightens slightly on its own. That gentle shift stops pieces falling apart when cut.
Cooling and Storage
Heat changes everything. Once baked, bread keeps warmth trapped if covered too soon – this traps moisture, creating dampness that invites mold.
Cool it completely on a counter; give it about two hours before tucking into foil or a breathable cloth sack.
Storage Guide
| Storage Method | Result |
| Countertop | Best everyday option |
| Foil wrap | Helps retain freshness |
| Cloth bag | Allows airflow |
| Refrigerator | Can dry the loaf |
Some might think fridges help in muggy weather, yet chilled air pulls out wetness quicker than expected. A shaded shelf nearby works better, letting texture stay steady without drying under lights.
Freezing Banana Bread
Once sliced, freeze right away for longer storage. Slips of waxed paper between pieces help them stay apart.
Room temp works best when warming up – done in under a few hours. Each repeat freeze weakens texture as tiny ice shifts inside.
Freezing Tips
- Slice before freezing
- Place wax paper between slices
- Thaw at room temperature
- Avoid repeated freezing
Self-Rising Flour and Baking Adjustments
Most times, self-rising flour makes it tough to manage salt levels or how much rise you get. When changing meals for health reasons, swapping ingredients means starting fresh with measurements.
Just trading self-rising for regular flour mixed with extras won’t act the same – tiny differences in grain texture and soak-up speed come into play because of factory methods. These ready-blend kinds usually rely on lighter wheat types built more for fluffy biscuits than heavy breads.
Baking at Higher Altitudes

High up, things bake differently. When air pressure drops past 1,500 meters, gases inside rise faster. That makes batters sluggish to firm.
Because self-rising flour holds a steady dose of leavening, cutting back means tweaking more than one thing – maybe dial down heat, add a bit more water. Otherwise, centers cave while peaks puff too high.
Also Read: Pimento Cheese Recipe with Cream Cheese: A Creamier Twist on a Southern Favorite
Common High-Altitude Challenges
- Faster expansion
- Slower setting
- Sunken centers
- Over-risen tops
- Uneven texture
Personal Preference Matters
One size fits none when it comes to what’s best. Some lean toward heavy, wet slices; others favor fluffy pieces that separate easily.
Each outcome counts as correct. Differences come down to how ingredients behave together – never a misstep in method.
The Simplicity Behind the Loaf
Baking here moves without beating butter first, passes on tangy swirls of sour cream, leaves out that usual splash of vanilla.
The bare approach shows what matters most:
- Ripe fruit sets the sweet depth
- Fat choice changes shelf life
- Flour blend alters texture
- Technique shapes the final result
Final Thoughts
Baked goods emerge plain. Frosting stays unnecessary. From the oven comes something whole – unchanged by polish, untouched by dreams, only food, shifting little by little as time passes.
There it sits on countertops, not out of habit, yet held in place by a thin stretch of time – just after stiffness fades, just before rot begins – when eating it still makes sense.